Difference between revisions of "GTOP030 Tutorial"
| Line 33: | Line 33: | ||
gdal_translate.exe -a_ullr 260 -10 300 -60 W100S10.DEM X260S10.DEM | gdal_translate.exe -a_ullr 260 -10 300 -60 W100S10.DEM X260S10.DEM | ||
| − | Will change the origin (upper left longitude) from -100 (as implied by the input file name) to +260. Note that I am using the prefix letter 'X' to indicate a remapped Western hemisphere file. | + | Will change the origin (upper left longitude) from -100 (as implied by the input file name) to +260 (i.e., 360 + (-100)). Note that I am using the prefix letter 'X' to indicate a remapped Western hemisphere file. |
You also need to manually edit the .HDR file that is attached to the .DEM. The original header will contain consecutive lines like this: | You also need to manually edit the .HDR file that is attached to the .DEM. The original header will contain consecutive lines like this: | ||
Latest revision as of 09:25, 4 June 2009
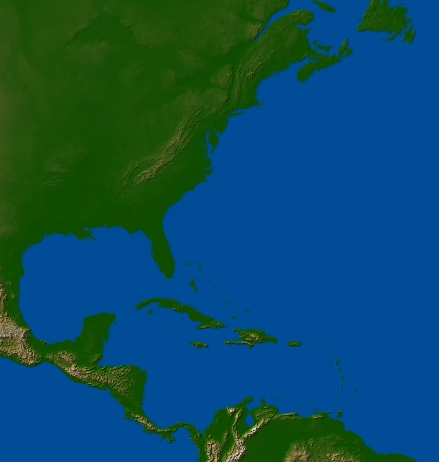
These instructions indicate how to construct a custom digital elevation map (DEM) using the GTOPO30 data. In this tutorial, we will create a map of the North Atlantic Seaboard which runs from 100W50N to 50W5N (see image below).
- Download and install FWTools. This will place a FWTools Shell icon on your desktop. From within this command line environment, a number of useful GDAL functions can be accessed.
- Goto GTOPO30 site and download the four DEM maps which span that area we are interested in: w100n90.tar.gz, w100n40.tar.gz, w060n40.tar.gz, w060n90.tar.gz
- Decompress the archives into a folder.
- Start the FWTools Shell by double clicking the FWTools Shell icon on your desktop.
- Navigate to the folder containing the decompressed files.
- To extract the area spanning 100W50N to 50W5N from these four DEMs use gdal_merge:
gdal_merge -o north_atlantic.tif -of GTiff -ul_lr -100 50 -50 5 W060N40.DEM W060N90.DEM W100N40.DEM W100N90.DEM
- This will result in a large (~62MB) GeoTiff file. Generally, it is best to work with smaller files within GenGIS. We can subsample this GeoTiff file using gdal_translate:
gdal_translate -of AAIGrid north_atlantic.tif -outsize 25% 25% north_atlantic.ascii
- This will create an ~10MB ASCII file suitable for use within GenGIS. We have switched to the ASCII file form because GDAL seems to have trouble producing subsampled GeoTiff files.
Note: GDAL does not overwrite files! If you wish to run either of these commands again with different parameters you either need to change the output file name or delete the previously made file.
Spanning the 180 degree line
A bit of extra work is required to build maps that span 180 degrees of longitude in the Pacific Ocean. In the usual coordinate system, this is a point of discontinuity, with -180 in the Western hemisphere and +180 in the Eastern.
The easiest solution to this is to keep the prime meridian as the zero coordinate, and monotonically increase the coordinate value as you go east, until you reach 360 degrees again at the prime meridian. Then there is a smooth transition in the Pacific, and North and South America will have longitudes in the 200-300 degree range.
GDAL can work in this coordinate system, and GenGIS has no problem with it either. But there are two things you will need to do before loading in your data:
- Use GDAL to convert any WESTERN HEMISPERE maps to the (180,360) coordinate system (note that EASTERN HEMISPHERE coordinates are unchanged)
- Convert any Western hemisphere locations you may have from (-180,0) to (180,360)
Two things need to be done to address (1), if you are starting from a typical .DEM file. First, use 'gdal_translate' to redefine the origin of your map. For instance:
gdal_translate.exe -a_ullr 260 -10 300 -60 W100S10.DEM X260S10.DEM
Will change the origin (upper left longitude) from -100 (as implied by the input file name) to +260 (i.e., 360 + (-100)). Note that I am using the prefix letter 'X' to indicate a remapped Western hemisphere file.
You also need to manually edit the .HDR file that is attached to the .DEM. The original header will contain consecutive lines like this:
ULXMAP        -99.99583333333334
ULYMAP        -10.00416666666667
You need to change ULXMAP to reflect the updated origin. Replace -99.99583333333334 with 260.00416666666667 to reflect the new point of origin. You do not need to change ULYMAP, but it's handy for copying over the numbers after the decimal point. Rename this file to make it consistent with the modified .DEM, in this case X260S10.HDR.
Secondly, in your location file any coordinates with a negative longitude x will need to be replaced with 360 + x. So a point at location (-120,30) will become (240,30).
That's it! Once the maps are individually modified, they can be manipulated as usual with GDAL, and loaded into GenGIS.
