GOS Tutorial
Contents
Introduction
GenGIS is a free and open-source bioinformatics application that allows geographic data to be merged with information about biological sequences collected from the environment. It consists of a 3D graphical user interface in which the user can navigate and explore the data, as well as a Python interface that allows easy scripting of statistical analyses using the Rpy libraries.
In this tutorial, we examine samples collected as part of the Global Ocean Sampling expedition (Rusch et al., 2007) in order to investigate the influence of environmental factors on the composition of microbial communities from marine ecosystems. A more thorough analysis of this data is available in Parks et al., 2009. This tutorial demonstrates how to load data, illustrates how to change visual properties, presents a detailed analysis of the geographic structure of these microbial communities, and examines the distribution of taxa within these samples. A video walkthrough of this tutorial is also available on the GenGIS website. To follow along with this tutorial download the data:
Loading Data
The GOS data consists of a 2D map (GOS_GS002_GS020.tif), projection information for the map (GOS_GS002_GS020.tfw), location data (atlantic-seaboard-sample-sites.csv), sequence data (atlantic-seaboard-sequence-data.csv), and a UniFrac tree indicating the relative similarity of the microbial communities (asb_unifrac_community_tree.gtm). Load this data into GenGIS. For basic information on using the GenGIS interface and loading data please see the Banza Katydid Tutorial.
Changing Visual Properties
GenGIS gives users considerable control over the visual properties of the data visualizations in the Viewport. This allows different aspects of the data to be emphasized which facilitates the exploration and communication of different hypotheses.
Location Set Properties
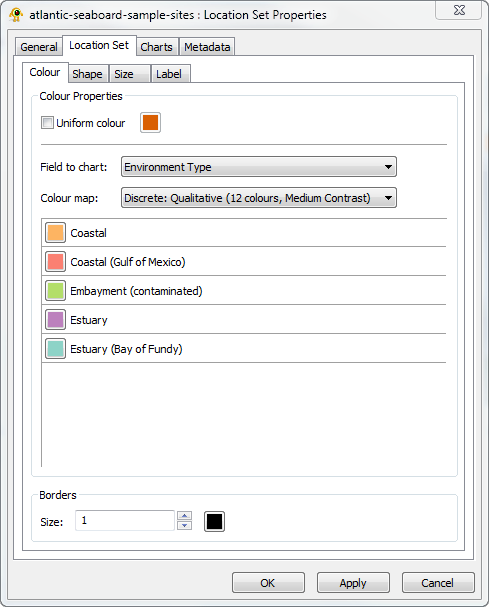
Properties common to all locations can be set through the Location Set Properties Dialog Box (Fig. 1). To open this dialog box, right-clicking the Location Set layer in the Layer Tree and select Properties from the pop-up menu. Here we will change the appearance of the location sites in order to emphasize the habitat from which each sample was taken. To set the colour of locations based on their habitat first uncheck the Uniform colour checkbox and then change the Field to chart to Environment Type. Now change the colour map to Discrete: Qualitative (12 colours, Medium Contrast) as shown in Figure 1 and hit OK. To further emphasis the habitat of each sample, click on the Shape tab and set the Field to chart to Environment Type. The colour and shape of each sample will now reflect its habitat. Clicking on the Locations tab within the main window (above the Layer Tree') brings up a set of legends describing the colour, shape, and size of each location.
Tree Properties
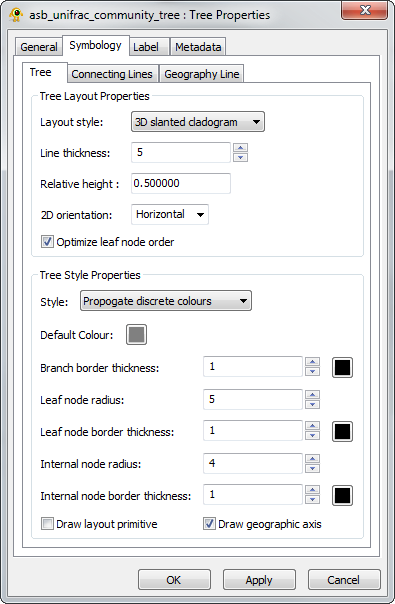
To modify the visual properties of the tree, right-click on the tree and select Properties from the pop-up menu. This will bring up the Tree Properties Dialog Box (Fig. 2). In the Symbology->Tree tab set the Line thickness to 5, the Relative height of the tree to 0.5, the tree Style to Propogate discrete colours, and the Default Colour to grey as shown in Figure 2. Click OK when done. Observe how the colours of branches in the tree now correlate with the location colours. Colours are propagate up from the leaf nodes of the tree until the children of a node have different colours, at which point the default colour will be used for all branches above this node.
Quantitative Analysis of Geographic Structure
The 3D geophylogeny suggests that habitat type has a large influence of the relative similarity of these microbial communities. The video tutorial, Banza Katydid tutorial, and the Parks et al., 2009 manuscript describe how 2D geophylogenies can be analyzed within GenGIS. The remainder of this section assumes you are familiar with the basics of how these analyses are conducted.
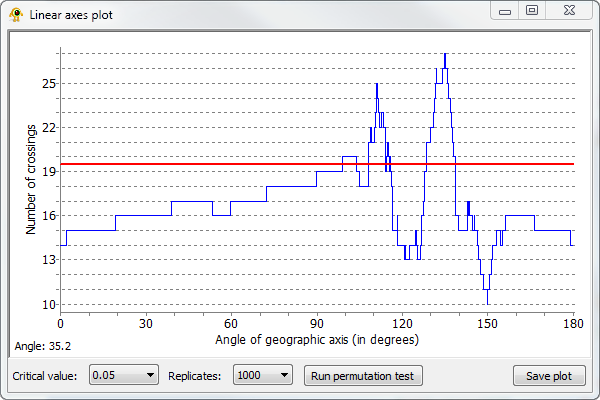
GenGIS allows the number of crossing which occur for all linear gradients to be explored. Right-click on the subtree of the geophylogeny you wish to analyze and select Perform linear axis analysis on subtree. This will produce a graph showing the number of crossings which occur for all possible linear gradients (Fig. 3). Clicking on the graph causes the linear layout line to rotate to a given orientation. Running a permutation test causes a red line to be drawn on the plot which indicates the number of crossings at which the specified critical value (i.e., p-value = 0.05) is obtained. That is, linear gradients with orientations resulting in fewer crossings are significant at the selected p-value.
Distribution of Sequences
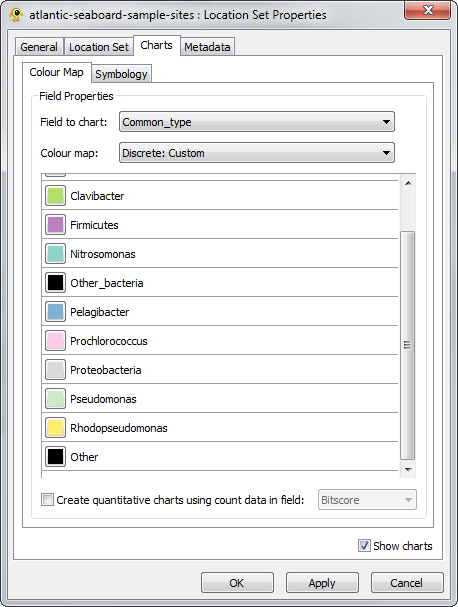
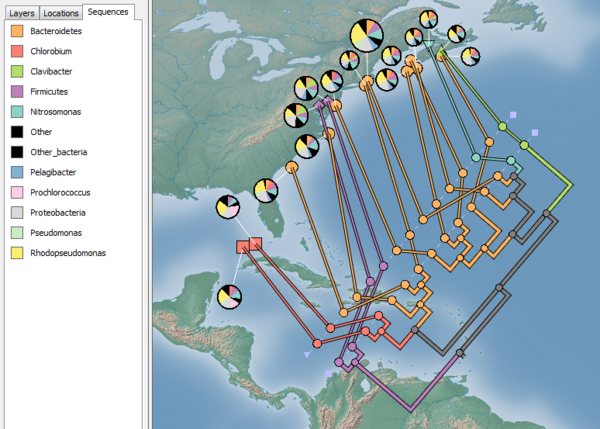
The distribution of sequences from the sampled microbial communities can be investigated by generating a pie chart for each sample. Pie charts are configured in the Charts tab of the Location Set Properties Dialog Box (Fig. 4). To visualize the distribution of common taxa, set the Field to chart to Common_type, the Colour map to Discrete: Qualitative (12 colours, Medium Contrast), and check the Show charts checkbox as shown in Figure 4. It is also helpful to manually modify the colour map so the Other_bacteria and Other categories are the same colour (e.g., black). You can also modify many properties of the pie charts in the Symbology tab. For this example, it is helpful to scale the size of the pie charts to reflect the number of sequences collected for each sample. Check the Set chart size proportional to number of sequences checkbox and set the minimum and maximum size to 20 and 40, respectively. Click OK when you are done.
You can drag the pie charts in order to lay them out in a pleasing manner as shown in Figure 5. A legend indicating the colour of each taxa is available in the Sequences tab within the main window.
Contact Information
We encourage you to send us suggestions for new features. GenGIS is in active development and we are interested in discussing all potential applications of this software. Suggestions, comments, and bug reports can be sent to Rob Beiko (beiko@cs.dal.ca). If reporting a bug, please provide as much information as possible and, if possible, a simplified version of the data set which causes the bug. This will allow us to quickly resolve the issue.
References
Rusch DB, Halpern AL, Sutton G, et al. 2007. The Sorcerer II Global Ocean Sampling Expedition: Northwest Atlantic through Eastern Tropical Pacific. PLoS Biol. 5:e77. PubMed
Parks DH, Porter M, Churcher S, Wang S, Blouin C, Whalley J, Brooks S and Beiko RG. 2009. GenGIS: A geospatial information system for genomic data. Genome Research, 19: 1896-1904. (Abstract)
